If you are starting with your online business and don’t understand much about setting up the DNS (e.g. Domain Name System) for your domain, that is alright. There is no need to feel bad about it because setting up a DNS create confusion in a lot of people. This article is a quick beginner’s guide that can help you understand about DNS. So let’s begin.
What is DNS?
In its definition, DNS is a hierarchical service of the Internet which is used for converting domain names into IP addresses. We can think of it as a phonebook of the Internet where each of us can access the information and other online services through domain names.
Web browsers communicate through Internet Protocols (IP). Hence, when we access information using domain name (e.g. plus.hr), web browsers don’t understand that. That is where DNS comes as an interface that converts domain names (e.g. plus.hr) into IP addresses (e.g. 185.220.27.145).
How to setup DNS?
The first step in setting up a DNS is to buy a domain name and hosting package where the domain will be installed. For example, if you bought a domain and hosting package at Plus Hosting and you would like to create website on our server, the domain must contain DNS records which looks like follows:
NS1: ns1.mojsite.com
NS2: ns2.mojstie.com
These records enable the domain to be online to the Internet so everyone could access them. The conclusion is that each domain in DNS must have NS records, and must be installed into the DNS zone where you buy a hosting packge for a website.
DNS editor
Once the domain is installed into the DNS zone, you can edit individual DNS records using a DNS editor. DNS editors can be different and their appearance depends on the hosting provider and server where the domain is installed. For example you can find cPanel, solidcP, Plesk, etc., but the structure of DNS records always stays the same. When you open DNS editor you can find common types of DNS records, such as:
- A Record (Address Record)
- AAAA Record (IPv6 Address Record)
- CNAME Record (Canonical Name Record)
- MX Record (Mail Exchange Record)
- TXT Record (Text Record)
- NS Record (Name Server Record)
- PTR Record (Pointer Record)
- SRV Record (Service Record)
DNS record naming
Each record above has a name, TTL (Time-To-Live), type and record:
- NAME is usually domain name or subdomain
- TTL (Time-To-Live) is time when DNS settings are cached before they are automatically refreshed
- Type – DNS record type (A, MX, CNAME, etc.)
- Record – it is a value for your domain, e.g. IP address, mail host, etc.
The most frequently used records that need to be changed are: A, MX, CNAME, SPF, DKIM and DMARC. They will be explained in continuation.
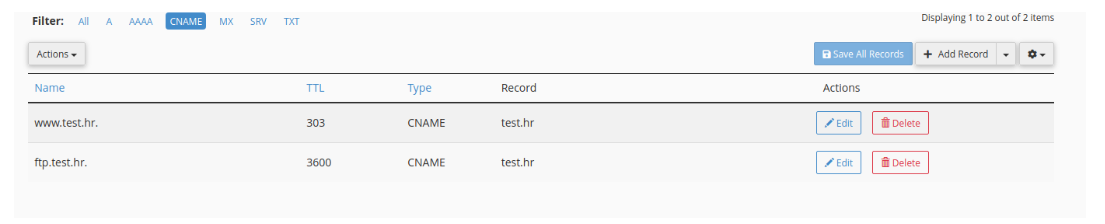
CNAME record (Canonical Name) is the type of the DNS record that redirects one domain to the other and always must point to a domain or subdomain, not an IP address.
If you have cPanel, under the DNS records option you can find DNS records for the domain. Here in my example is subdomain www.test.hr which redirects to domain test.hr via CNAME record and opens the same value from the same server. This is shown in Image 1.
A record links a domain with an Ip address
An A record stands for Address and links a domain with an IP address. When you search for a certain domain on the Internet, such as https://plus.hr, this domain redirects to an IPv4 address which is set up into a DNS zone where the domain is located. In the example below, you can find domain test.hr where A record redirects to IP 178.218.165.202. This IP address is the specific IP address where the website with domain name test.hr is stored. You can also see the subdomain mail.test.hr which is also A record, but record for email server. It can be seen from this, and later in Image 2., that A record for a website and A record for email use the same server and the same IP. It is possible to have multiple domains and subdomains with the same records in the same DNS zone.

What is MX record
MX (Mail Exchanger records) Record is a record that routes email to specified mail servers. When an email and a website need to be located on the same server, MX records usually redirect to mail.test.hr. It is because mail.test.hr is a subdomain that redirects to the IP address of the server, like it is shown in example above.

What about when your email address needs to be on another mail server, like Google Workspace or Office365?
In that case, it is required to set up an MX record that redirects to Google or Office365 server. The example of setting up Google MX records is given in Image 4.
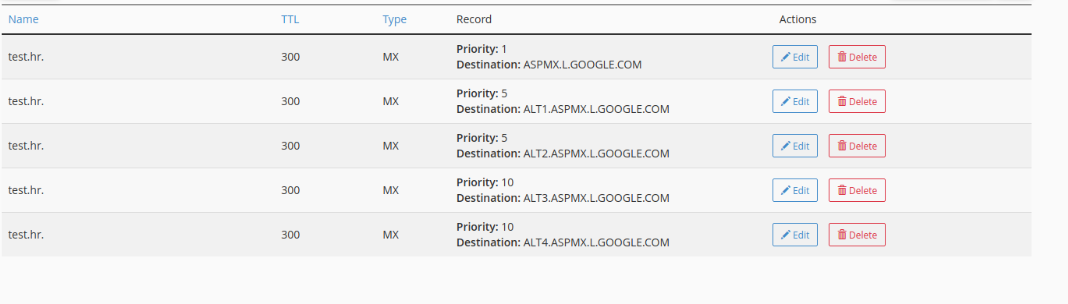
In this example, you can see that Google has five records for its own email server with different priorities. What does Priority mean?
The Priority indicates through which mail server the mail message will be delivered first. The lower number of Priority means higher priority of MX record. Let me explain, the record ASPMX.L.GOOGLE.COM is the first mail server with the highest Priority where the mail message will be delivered, but in case this doesn’t work, the next mail server for delivery will be the one with the lower Priority, ALT1.ASPMX.L.GOOGLE.COM, and so on.
What to do if DNS isn’t on our server and you will use our Mail Only service?
Mail Only service is a service where you can set up email without websites. It is suitable for a business where you don’t need websites or you just need a slightly higher disk usage for email addresses. In this case, in the DNS zone where the domain is located, it is required to set up the MX record to our IP address server which you can get after buying Mail Only service.
What can prevent the delivery of a mail message?
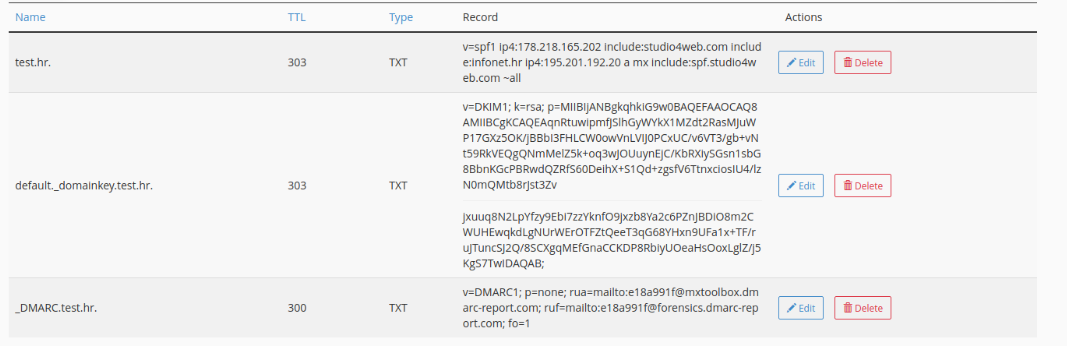
Have you ever had a problem with delivering email? You most likely did. Nowadays, when the Internet is full of SPAM mail messages, it is very important to take care of email security. Many servers require the domain to have mail security records which prove the validity of the domain and the email message. Three email authentication methods for domain are SPF, DKIM and DMARC record. SPF and DKIM help to demonstrate legitimacy of your email message, while DMARC record tells email servers what to do in case SPF and DKIM fail.
DMARC is actually in charge of marking mail messages as SPAM, dropping the emails or delivering the emails.
Domains that don’t have a correct setup of these three records, server of recipients will send email messages to quarantine as spam or not deliver them it all. You can check SPF, DKIM and DMARC with your hosting provider, and be sure to set them up in the domain’s DNS zone. In Image 5. you can see how it looks like when SPF, DKIM and DMARC are set up correctly.


